alas, there have been SERIOUS computer issues in the goldfish household...
slowly getting things back together, but it will be a few more days until I am back to blogging again
ahhh - technology - wonderful when it's working,
but a giant pain in the butt when it's not!
Tuesday, March 31, 2009
Wednesday, March 25, 2009
the first of many...
So many of you have correctly noted that I need to make myself some hats...
This super-short hair cut of mine is wonderfully low maintenance, but BOY does it get breezy!
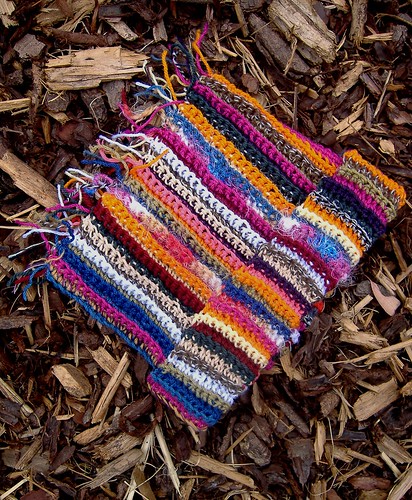
pattern used:
thoughts:
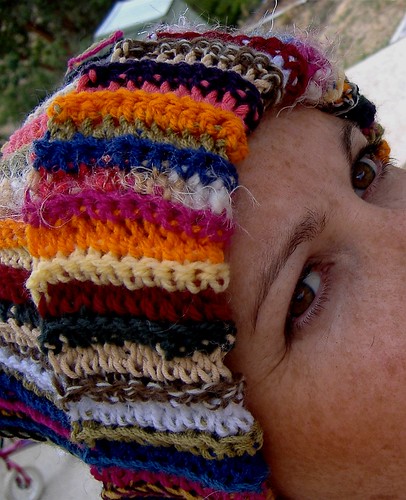
This super-short hair cut of mine is wonderfully low maintenance, but BOY does it get breezy!
pattern used:
- accidental hat
- modification - I worked through BLO (back loops only)
- 5.0mm hook
- something different for every row! mostly 8ply... but I wasn't too fussy
thoughts:
- love the idea of working through the back loops only
- it gives a wonderful stretchy rib texture to the hat
- this hat is comfy and oh so warm... exactly what I needed
- I wore it to a BBQ last week, and got an amazing response. So many people are wanting to place orders so that they can have one too!
Tuesday, March 24, 2009
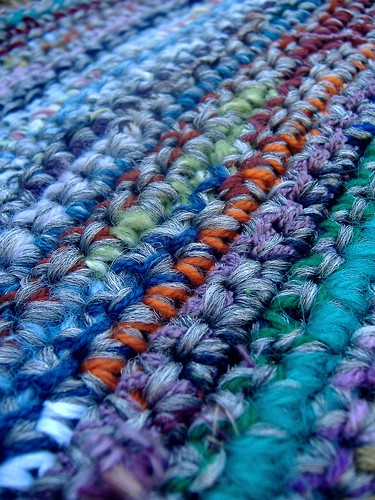
crochet hairpin lace scarf
Last time we spoke, I was wanting to block this project... but the iron had not been seen since Mr Goldfish put it away for me. Well, I checked all of the obvious places and then gave up looking.
I conceded defeat, and asked the big question...
me: Huuuuunnnnn.... where's the iron???
he: in the bathroom cabinet, under the sink
How foolish of me not to have looked there first...

pattern used
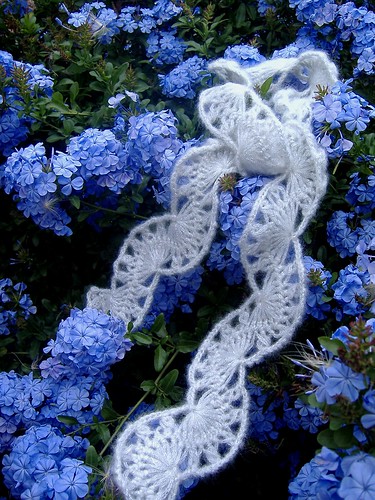
thoughts
I conceded defeat, and asked the big question...
me: Huuuuunnnnn.... where's the iron???
he: in the bathroom cabinet, under the sink
How foolish of me not to have looked there first...
pattern used
- Crochet Hairpin Lace Scarf by Lisa Gentry
- 4.0mm crochet hook
- 2" hairpin staple
- pattern calls for a much larger size to be used, but the 2" staple was the largest available to me
- Red Heart Bijou in Diamond
thoughts
- NEWSFLASH: if you are using a U-shaped hairpin crochet staple, you MUST remove the top bar prior to use... it is NOT a working part of the loom... it merely acts to keep your stitches from sliding off the loom when not in use! I learned this the HARD way!!! So a big thanks to my crochet buddy Dawn, who set me straight about this particular detail...
- I discovered the hairpin lace is NOT DIFFICULT... most instructions just make it seem harder than they need to!
- this pattern is available free to members of the Lisa's Designs group on Ravelry for the month of March... along with a couple of other hairpin lace patterns
- although Lisa's instructions for the hairpin lace technique were very detailed... they just confused me!
- there is an excellent video below, which many people have found helpful... but I still couldn't master the technique
- in the end... the video below was the one which helped me figure out hairpin crochet
Monday, March 23, 2009
finally...
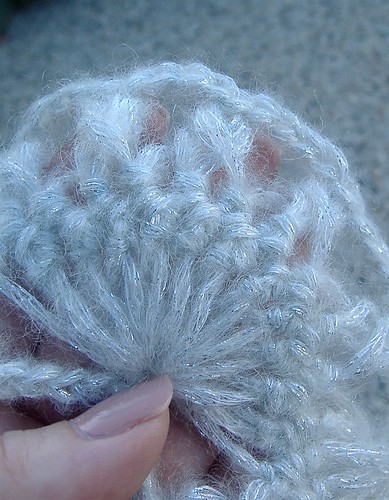
I've been desperately trying to master the technique of hairpin lace... and FINALLY I have the hang of it! Here's a sneak peek at what I have been working on, and I'll share more of the details with you tomorrow.
I would like to block it later today... if I can find the iron!
Mr Goldfish kindly put it away for me the other day, and I can't find it anywhere... wish me luck...
I would like to block it later today... if I can find the iron!
Mr Goldfish kindly put it away for me the other day, and I can't find it anywhere... wish me luck...
Friday, March 20, 2009
my... what big eyes you have grandma!
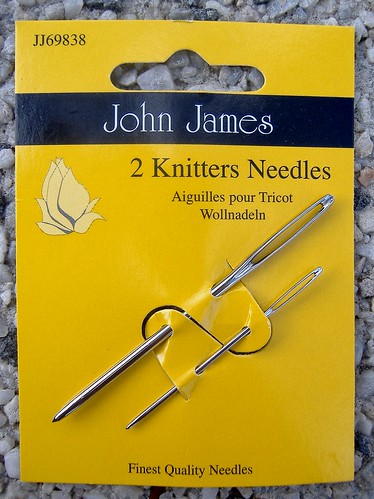
I like to call these my GRANDMA needles...
Those big eyes remind me of the story of Little Red Riding Hood... My what big eyes you have Grandma!
I love my wool needles to be big and chunky and blunt. The kind of needles that a three-year-old could thread. Darning in your yarn tails at the end of a project can be a monotonous enough task... you might as well make the threading part easy on yourself.
Today I'm hoping to finish darning the tails of my seraphina shawl and maybe even get it blocked, too... then I'll have some finished photos to share with you all.
Thursday, March 19, 2009
centre heart

pattern used:
hook used:
- 5.0mm crochet hook
yarn used:
- pattern calls for 10ply... I used an assortment of 8ply/DK weight reclaimed yarns
- rounds 1, 2, 3 and 4 - dark burgundy
- rounds 5 and 6 - cream
- round 7 - camel fleck
- round 8 - river gum green
- round 9 - dark burgundy
- round 10 - mid blue
- round 11 - brown and white fleck
- round 12 - burgundy
thoughts:
- as always, I started with an adjustable magic ring
- I need to learn to read patterns more carefully... for example... in round 2 where the pattern reads 2 tr in each of next 2 sc... it means 2 tr in each of next 2 sc... a total of 4tr... VERY IMPORTANT!!! I learned the hard way, and got frustrated beyond words that it wasn't working out properly. Thanks to a wonderful crochet buddy (that's you Daphne!) I was able to see the error of my ways.
- round 12 modification - I was almost at 12 inches already, so I worked this round in hdc instead of dc
- I didn't like the way my heart looked... it wasn't as shapely as I would have hoped... so I added a tiny bit of embroidered detail to better define the shape. Nothing fancy, just two strands of the cream yarn worked in a running stitch between rounds 3 and 4. Simple but effective.

Wednesday, March 18, 2009
st patrick's day
So yesterday was St Patrick's Day... and I made a green scarf to celebrate...

pattern used
needles used
pattern used
needles used
- 4mm straights
- crazy yarn, made with only greens
- simple... scrappy... effective... love it!
- don't tell anyone, but I actually I followed the pattern as it is written - NO modifications
Tuesday, March 17, 2009
something precious...
I want to show you something precious...
After Master Nine and Master Six watched Mr Goldfish shave my head for me, they decided that it looked so COOL that they wanted theirs done too!

After Master Nine and Master Six watched Mr Goldfish shave my head for me, they decided that it looked so COOL that they wanted theirs done too!
all gone...
well... yesterday I showed you the before shots...
here is the after!

It's okay if you don't recognise me... because I barely recognise myself...
here is the after!
It's okay if you don't recognise me... because I barely recognise myself...
Monday, March 16, 2009
hair today... gone tomorow
Those of you have been following my blog for a while now, know that I recently lost my mum to leukemia.
Actually, it's been over five months now... but it still feels very recent.
As a result, I decided to participate in THE WORLD'S GREATEST SHAVE to raise funds for the Leukemia Foundation. Click here if you are able to help by sponsoring me.
So... here is me before the big shave

and you'll have to check in again tomorrow to see the after shots!

Actually, it's been over five months now... but it still feels very recent.
As a result, I decided to participate in THE WORLD'S GREATEST SHAVE to raise funds for the Leukemia Foundation. Click here if you are able to help by sponsoring me.
So... here is me before the big shave
and you'll have to check in again tomorrow to see the after shots!
Sunday, March 15, 2009
accidental hat revisited...

pattern used:
- accidental hat
- modification - I worked through BLO (back loops only)
- 5.0mm hook
- this stuff here
- it seems to be about a 10ply... is hairy, but soft... and oh so snuggly
- love the idea of working through the back loops only
- it gives a wonderful stretchy rib texture to the hat
- will definitely used this method in future
- this hat was made to fit a three-year-old... but because of the stretch in the stitch pattern... it will comfortably fit an adult, too!
- flower pattern is taken from the little miss two bag... I worked only round 1, using a 7.0mm hook and 12ply yarn

Saturday, March 14, 2009
winter dream

pattern used:
hook used:
- pattern calls for a 5.5mm hook... I used a 4.0mm hook
yarn used:
- pattern calls for 10ply... I used an assortment of 8ply/DK weight reclaimed yarns
- rounds 1 and 2 - dark burgundy
- round 3 - cream
- round 4 - oatmeal
- rounds 5 and 6 - brown and white fleck
- round 7 - cream
- round 8 - river gum green
- round 9 - mid blue
- round 10 - navy
- round 11 - river gum green
- added an extra round of dc - burgundy
thoughts:
- don't really know why I used such a small hook for this... I don't even think I checked the pattern for size before I started
- anyway, it meant I had to add an extra round to bring it up to size
- round 12 - worked a dc into each stitch of previous round, (2dc, ch2, 2dc) at corners
- don't panic if your shape is looking VERY unsquare at the end of round 5... keep following the pattern and it will sort itself out in round 6
- this is a perfectly likable square... it just feels quite bland after the exquisite irish rose I showed you yesterday
Friday, March 13, 2009
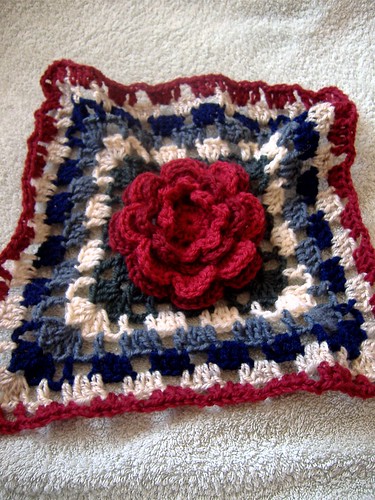
irish rose
pattern used:
hook used:
- pattern calls for 5.0mm... I used a 4.0mm
yarn used:
- pattern calls for 10ply... I used an assortment of 8ply/DK weight reclaimed yarns
- rounds 1, 2 and 3 - maroon
- round 4 and 5 - dark burgundy
- rounds 6 and 7 - maroon
- rounds 8, 9 and 10 - dark burgundy
- rounds 11 and 12 - river gum green
- round 13 - cream
- round 14 - mid blue
- round 15 - navy
- round 16 - oatmeal
- round 17 - dark burgundy
- round 18 - omitted... already large enough
thoughts:
- I love this square, but it is very bulky... honestly not sure if it will be suitable as part of the afghan or not
- might make a cushion out of it instead
- interestingly... I used a smaller hook and finer yarn than the pattern called for... and I still had to omit the last round, because I had already reach my 12 inches
- the flower part of this would look fabulous as an embellishment on a bag
- I found this video below which might come in helpful if you find the rose instructions confusing
Thursday, March 12, 2009
the "B" word
blocking....
There... I said it
I know that the idea of blocking goes completely against the casual and low fuss approach which I usually take towards my crafting... but let me share a secret with you... it works!
I certainly don't block every project... but there are some which benefit greatly from it...
So what is this 'blocking' all about then?
It is simply a method of shaping your finished piece... so that it sits nicely.
Think about the clothing in your wardrobe for a moment. Some garments MUST be ironed, some DON'T require any ironing... and then there are those which you can't really be bothered ironing, and sometimes you try and get away without bothering... but they really look and fit MUCH BETTER if you do.
Know what I mean?
Blocking is the same.
Some pieces do not require blocking... some do... and it's entirely up to you whether you do it or not! There are no blocking police.
But be aware that blocking can really improve the appearance of your work.
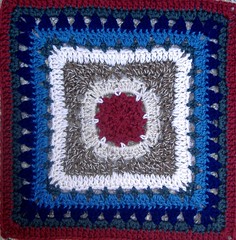
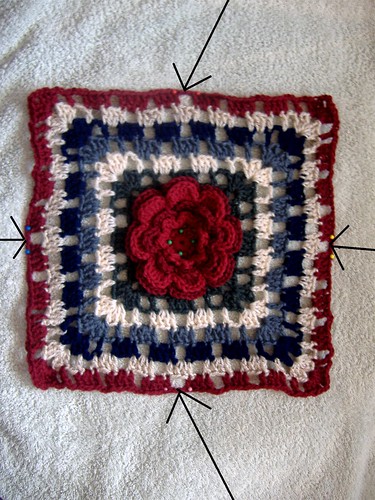
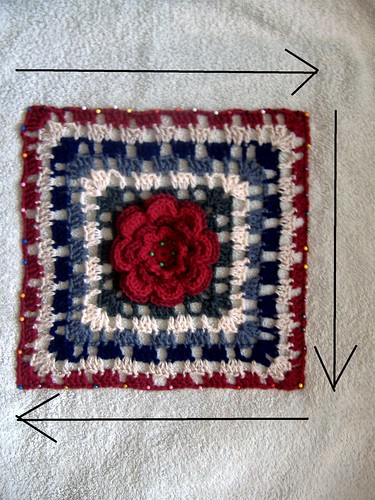
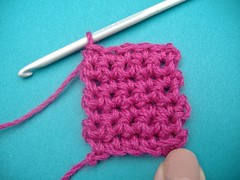
Look at this square I recently completed:
See how the centre looks fine, but then by the time you get to the outer edges it's all wavy and wobbly and messy???
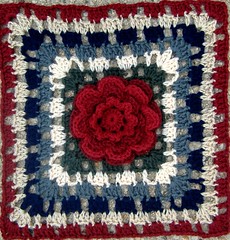
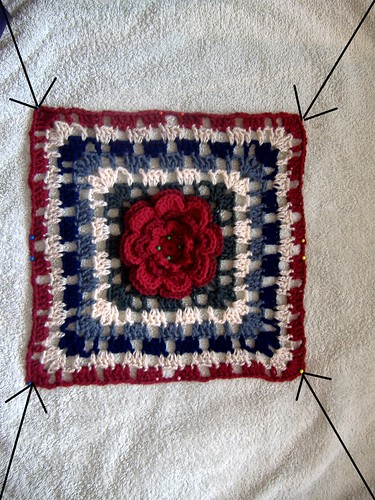
Well, I blocked it - and now it looks like this:

Better?
Certainly benefited from blocking, didn't it?
You don't need anything fancy for blocking. Sure, you can purchase specifically designed blocking boards or wires and pins, etc... but you know I like to keep it basic - right?
Very basic - pin it... wet it... dry it
that's all... three simple steps
I used
Then placed the square on top, and pinned securely in the centre. I like to use four pins so that it is well secured, and I push the pins right into the thickness of the towels.
I wanted my square to be 30cm square. So I measured 15cm out from the centre to each side, stretching a little where necessary, and pinned it in place. I used two pins at each side, just so there wasn't too much tension on any one pin.
Then I moved on to the corners... checking the length was correct and pinning in place.
After that it was just a matter of pinning all along the edges, all the way around the square... ensuring things were straight. I use a lot of pins - perhaps more than necessary - but it works for me.
The next part is easy. I sprayed the piece with water, just damp... don't need to saturate... put an old hanky over the top... and lightly ironed it (wool setting, gentle pressure)
Then left it undisturbed to cool down and dry completely. Removed the pins... VOILA!
No matter what the fibre type, the basic steps remain the same
If you are using acrylic... the recommendation is not to use heat... but I sometimes do (just very gently and very carefully, you don't want to flatten the life out of it)
If you are unsure... there is no need to use heat at all!
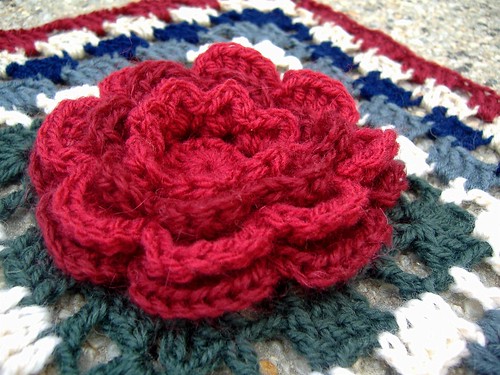
Also avoid pressing textured pieces... for example... I did NOT press the flower at the centre of this square.
Be bold and BLOCK! The results may surprise you...
There... I said it
I know that the idea of blocking goes completely against the casual and low fuss approach which I usually take towards my crafting... but let me share a secret with you... it works!
I certainly don't block every project... but there are some which benefit greatly from it...
So what is this 'blocking' all about then?
It is simply a method of shaping your finished piece... so that it sits nicely.
Think about the clothing in your wardrobe for a moment. Some garments MUST be ironed, some DON'T require any ironing... and then there are those which you can't really be bothered ironing, and sometimes you try and get away without bothering... but they really look and fit MUCH BETTER if you do.
Know what I mean?
Blocking is the same.
Some pieces do not require blocking... some do... and it's entirely up to you whether you do it or not! There are no blocking police.
But be aware that blocking can really improve the appearance of your work.
Look at this square I recently completed:
See how the centre looks fine, but then by the time you get to the outer edges it's all wavy and wobbly and messy???
Well, I blocked it - and now it looks like this:
Better?
Certainly benefited from blocking, didn't it?
You don't need anything fancy for blocking. Sure, you can purchase specifically designed blocking boards or wires and pins, etc... but you know I like to keep it basic - right?
Very basic - pin it... wet it... dry it
that's all... three simple steps
I used
- a couple of old towels
- a tape measure/ruler
- lots of regular sewing pins
- a spray bottle of water (or just the spray jet on my iron)
- one of Mr Goldfish's hankys, clean of course!
- steam iron
Then placed the square on top, and pinned securely in the centre. I like to use four pins so that it is well secured, and I push the pins right into the thickness of the towels.
I wanted my square to be 30cm square. So I measured 15cm out from the centre to each side, stretching a little where necessary, and pinned it in place. I used two pins at each side, just so there wasn't too much tension on any one pin.
Then I moved on to the corners... checking the length was correct and pinning in place.
After that it was just a matter of pinning all along the edges, all the way around the square... ensuring things were straight. I use a lot of pins - perhaps more than necessary - but it works for me.
The next part is easy. I sprayed the piece with water, just damp... don't need to saturate... put an old hanky over the top... and lightly ironed it (wool setting, gentle pressure)
Then left it undisturbed to cool down and dry completely. Removed the pins... VOILA!
No matter what the fibre type, the basic steps remain the same
- pin
- wet
- dry
If you are using acrylic... the recommendation is not to use heat... but I sometimes do (just very gently and very carefully, you don't want to flatten the life out of it)
If you are unsure... there is no need to use heat at all!
Also avoid pressing textured pieces... for example... I did NOT press the flower at the centre of this square.
Be bold and BLOCK! The results may surprise you...
Wednesday, March 11, 2009
a lacey basket?
I almost threw these old lacey curtains away...
For the past few years they've been hanging in the bedroom of Master Six. Now for those of you who haven't met Master Six... let's just say that he's not the most delicate creature to grace our household! He's a boy's boy through and through - a middle child - wild, crazy, and more than just a little bit full on.
As you can imagine... those poor lace curtains didn't really stand a chance. I repaired the first few holes, but after that it just became ridiculous...
So the curtains are down, and replaced by a less destructible blind.
I can't believe I almost threw them away...
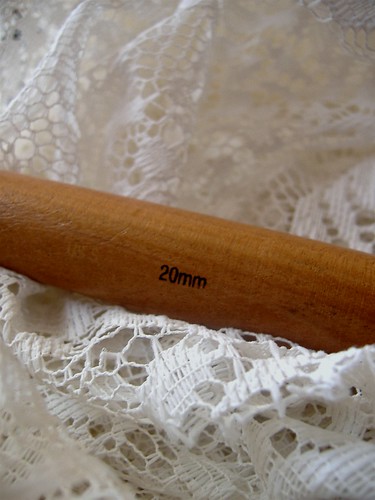
They've been through the wash, and are ready to use. I'm planning to make a basket for Little Miss Four's dolls to sleep in. I think I'll cut it into 2cm widths, and then crochet the basket using my 20mm hook (which some of you might remember as the 'table leg')
It will be my first time crocheting WITH lace... stay tuned to hear how it goes...
Tuesday, March 10, 2009
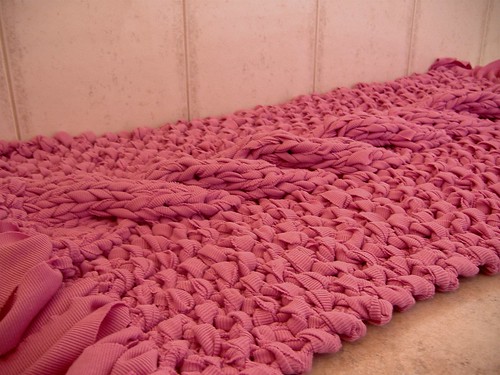
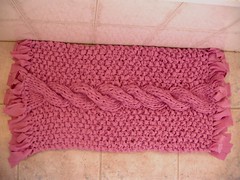
bathmat... completed
pattern used
needles used
- 15mm needles
- pattern actually calls for 19mm needles, but I don't own any!
yarn used
- the fabric is some kind of ribbing... looks like the kind of thing you would use to trim t-shirts perhaps? I found a couple of rolls of it at the op shop
- it's about 3cm wide

thoughts
- the cable looks really chunky, but is actually quite soft underfoot
- although the cable adds visual interest to the mat... if I was making another one, I would omit the cable and just work the piece in moss stitch
- love the moss stitch... creates a really nice texture underfoot
- measures 46cm x 84cm... next time I would make it a bit wider... just because that's what I prefer!
Monday, March 9, 2009
the scrappy kitchen mat
I've been plodding away at the scrappy kitchen mat... using some grey carpet nylon worked together with my crazy yarn.
Absolutely loving the results so far. In fact... I'd love to carpet my entire home in this stuff!!!
Unlikely... but a girl can dream, can't she???
Here's a sneak peek at how it is looking so far:
Absolutely loving the results so far. In fact... I'd love to carpet my entire home in this stuff!!!
Unlikely... but a girl can dream, can't she???
Here's a sneak peek at how it is looking so far:
Saturday, March 7, 2009
losing shape - losing stitches... part 2
I'm not an expert when it comes to crochet...
in fact, I still consider myself a beginner in many ways!
But I have experienced a great deal of frustration when first learning...
it almost seemed as though there were these unwritten rules with crochet - things that you were just supposed to KNOW... even though you had never been told!
Well... that's how it felt to me, anyways.
Last time I talked about how to keep your edges straight when working a flat piece of sc or hdc. I mentioned that the place where you are most likely to run into trouble is where you work the FIRST and the LAST stitches of each row... and that the part which can trip you up is that the 'rule' changes depending on which stitch you are working in.
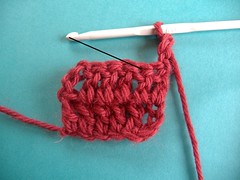
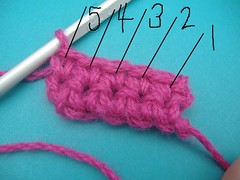
So this time we will look at what to do differently when working in dc (US)
(this is also the method to use if you are working in tr, except that you would work 4 turning chain at the end of each row)
Grab your hook and some practice yarn again, and I'll talk you through the process:
chain 8:
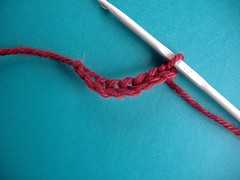
dc into 4th chain from hook

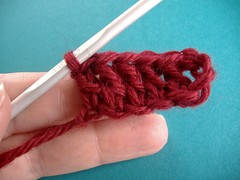
dc into next 4ch:
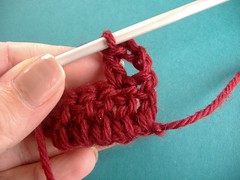
ch3 and turn work:
skip the first stitch and work your 1st dc into the top of the 2nd stitch as shown in the diagram:

it will feel like you have left a gaping hole - don't worry - you're doing the right thing
dc into next 3 stitches...
then dc into the top of your turning chain from the previous row:

5dc in total

count in your head as you go:
ch 3, turn... 1... 2... 3... 4... 5...
ch 3, turn... 1... 2... 3... 4... 5...
ch 3, turn... 1... 2... 3... 4... 5...
over and over again until you have the hang of it... it won't take long

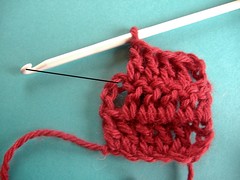
see the way the sides are even and I am not losing stitches? yay!

if the sides look a tiny bit wavy like mine, don't stress... if you want to straighten them more perfectly, you can block your work when you are finished
Now... I'm sure I heard someone comment that they had trouble with losing stitches when working in the round... leave it with me, and I'll talk you through that one in a few days time.
in fact, I still consider myself a beginner in many ways!
But I have experienced a great deal of frustration when first learning...
it almost seemed as though there were these unwritten rules with crochet - things that you were just supposed to KNOW... even though you had never been told!
Well... that's how it felt to me, anyways.
Last time I talked about how to keep your edges straight when working a flat piece of sc or hdc. I mentioned that the place where you are most likely to run into trouble is where you work the FIRST and the LAST stitches of each row... and that the part which can trip you up is that the 'rule' changes depending on which stitch you are working in.
So this time we will look at what to do differently when working in dc (US)
(this is also the method to use if you are working in tr, except that you would work 4 turning chain at the end of each row)
Grab your hook and some practice yarn again, and I'll talk you through the process:
chain 8:
dc into 4th chain from hook
dc into next 4ch:
ch3 and turn work:
skip the first stitch and work your 1st dc into the top of the 2nd stitch as shown in the diagram:
it will feel like you have left a gaping hole - don't worry - you're doing the right thing
dc into next 3 stitches...
then dc into the top of your turning chain from the previous row:
5dc in total
count in your head as you go:
ch 3, turn... 1... 2... 3... 4... 5...
ch 3, turn... 1... 2... 3... 4... 5...
ch 3, turn... 1... 2... 3... 4... 5...
over and over again until you have the hang of it... it won't take long
see the way the sides are even and I am not losing stitches? yay!
if the sides look a tiny bit wavy like mine, don't stress... if you want to straighten them more perfectly, you can block your work when you are finished
Now... I'm sure I heard someone comment that they had trouble with losing stitches when working in the round... leave it with me, and I'll talk you through that one in a few days time.
Friday, March 6, 2009
losing shape... losing stitches
Okay... this is a really common problem for those learning crochet...
I know, because I have experienced it first hand. Working row after row of regular crochet... just trying to make a square or a rectangle, but the shape goes all wonky - and you realise you are losing stitches. Sound familiar to anyone?
Well... I know that some of you are struggling with this... because you have told me!
So.
Stop reading right now...
Go and get yourself a hook and some practice yarn...
and we will work through it together!
Ready?
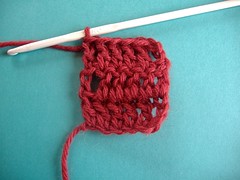
The place where you are most likely to run into trouble is where you work the FIRST and the LAST stitches of each row... and the part which can trip you up is that the 'rule' changes depending on which stitch you are working in.
To keep it really simple for today, let's use single crochet (US)
chain 6:

sc into 2nd chain from hook, sc into next 4ch:

ch1 and turn work
work your first sc into the first stitch as shown in the diagram:
sc into next 4 stitches... 5sc in total:
ch1, turn work
sc into first stitch:
sc into next 4 stitches... 5sc in total
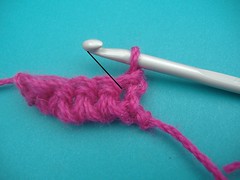
count in your head as you go:
ch 1, turn... 1... 2... 3... 4... 5...
ch 1, turn... 1... 2... 3... 4... 5...
ch 1, turn... 1... 2... 3... 4... 5...
over and over again until you have the hang of it... it won't take long
see the way the sides are even and I am not losing stitches? yours will look like this too...
so... that's the way to start and finish your rows when you are working in either sc or hdc...
next time I'll show you what you need to do differently if you are working in dc or tr - it's not hard - you just need to know the rules!
I know, because I have experienced it first hand. Working row after row of regular crochet... just trying to make a square or a rectangle, but the shape goes all wonky - and you realise you are losing stitches. Sound familiar to anyone?
Well... I know that some of you are struggling with this... because you have told me!
So.
Stop reading right now...
Go and get yourself a hook and some practice yarn...
and we will work through it together!
Ready?
The place where you are most likely to run into trouble is where you work the FIRST and the LAST stitches of each row... and the part which can trip you up is that the 'rule' changes depending on which stitch you are working in.
To keep it really simple for today, let's use single crochet (US)
chain 6:
sc into 2nd chain from hook, sc into next 4ch:
ch1 and turn work
work your first sc into the first stitch as shown in the diagram:
sc into next 4 stitches... 5sc in total:
ch1, turn work
sc into first stitch:
sc into next 4 stitches... 5sc in total
count in your head as you go:
ch 1, turn... 1... 2... 3... 4... 5...
ch 1, turn... 1... 2... 3... 4... 5...
ch 1, turn... 1... 2... 3... 4... 5...
over and over again until you have the hang of it... it won't take long
see the way the sides are even and I am not losing stitches? yours will look like this too...
so... that's the way to start and finish your rows when you are working in either sc or hdc...
next time I'll show you what you need to do differently if you are working in dc or tr - it's not hard - you just need to know the rules!
Subscribe to:
Posts (Atom)