edited to add - rag bag progress photos here
Here we go with the instructions for a simple crochet bag... and I do mean simple! I've tried to explain every step carefully, post a comment at the bottom if there is any confusion and I will do my best to clear it up for you.
Don't be frightened by the number of photos. This is not complicated! I just wanted the beginners to be able to follow every little step along the way. If you would like to enlarge any of the pictures, just click on them to go to my flickr account where you will be able to view them in a larger size.

Start by choosing your yarn... I'm going to work with three strands held together... the pink is a wool, the multi-coloured is an acrylic, and I have no idea what the blue one is! They are all an 8ply/DK weight.

Don't be frightened to mix yarn types... there are NO RULES here. Just select whatever you want.
Doesn't even need to be yarn... could be plarn or rags or jute or string... absolutely anything.
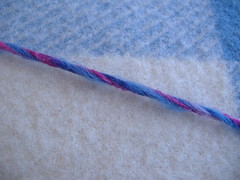
Give your yarns a little twist, just to get an idea of how they will look when worked together.
I'm happy with this blend!
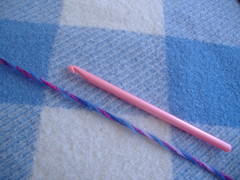
Choose a hook. If in doubt about the size... always go a little smaller. A smaller hook will give you a firmer crochet fabric and a more sturdy finished product.
Here I'm choosing to use a 6.5mm hook
Now for that rectangle!

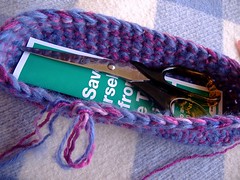
The base of the bag will be rectangular. Have a think about the size you would like your bag to be.
I've folded a pamphlet in half to use as a template. It will help you visualise what we are doing here.
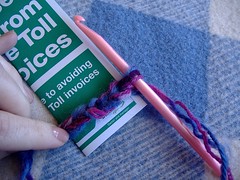
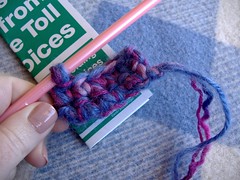
Start by working a row of chain stitches the length of the short end of your rectangle. Here I have worked only 5ch.
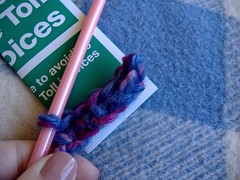
ch 1, sc into 2nd ch from hook, sc to end... (I have worked 5sc)
ch 1, turn work, sc into top of each stitch (again I have worked 5sc)
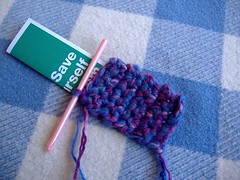
Keep repeating this row, until you have completed your rectangle. I worked 20 rows in total.
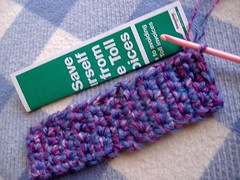
This is the base of the bag completed. Now to start on the sides.
Do not turn your work. Make another sc in the same spot as your last one.
You are now working a row of sc down the length of your rectangle, do this by placing a sc in the end of each of the previous rows.
When you reach the end, work 2sc into the 'corner stitch'.
Work a row of sc into the other end of your rectangle.
Then 2sc into the next corner, and work along the final side of the rectangle.

You have just completed the first 'round' of the bag.
Don't worry about joining the rounds, just work in spirals.
Don't bother with marking the end of each round either.
Keep working in sc.
You are NO LONGER working 2sc into the corner stitches.
Just work one sc into each stitch.
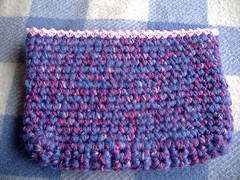
After a few rounds you should see your bag beginning to take shape.
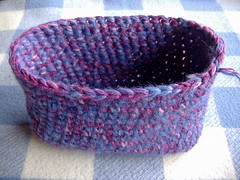
Continue until you are happy with the 'height' of the bag... I worked approximately 15 rounds. Work a slip stitch into the next stitch, cut yarn and fasten off. I try to finish off in a 'corner' rather than in the middle of the bag.
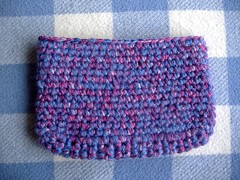
Lay the bag flat. Choose a yarn for the trim. If you want a subtle look, you could use one of the three yarns you used for the body of the bag. Or contrast with a completely new colour.
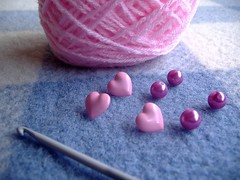
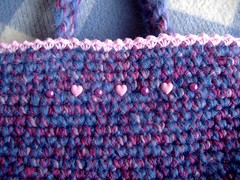
I have chosen some light pink beads and buttons to add to the bag, so I am going to use a light pink contrasting trim colour.
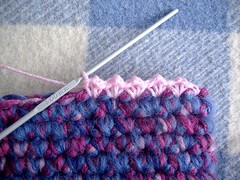
I'm going to work a small picot edge using a single strand of yarn and a 3.0mm hook. Starting at one end of the bag, work (sc, ch2, sc) into each stitch.
Continue this picot pattern for a full round. Join and fasten off. Weave in all ends.
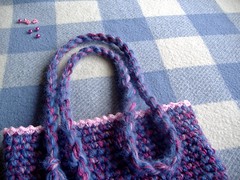
I'm going to add two twisted cord handles... click here for my tutorial
A tiny bit of maths here...
- work out the length you want each strap to be
- add a little extra to attach to bag
- multiply this by 2 because we are going to make a cord long enough for both straps
- then multiply this by 3 because you will lose some length in the twisting and folding process
- this is the length of each piece of yarn needed
- I used 12 strands in total, four of each colour
Once your cord is complete, we need to cut it into two.
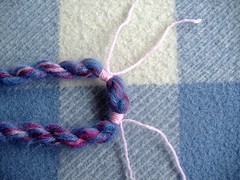
Fold in half and tie some yarn very firmly on each side of where you plan to cut. I am a bit obsessive about this. I wind and tie the yarn about ten times, just to be sure it is totally secure.
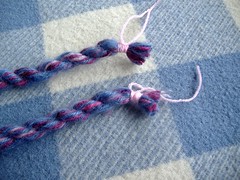
then snip
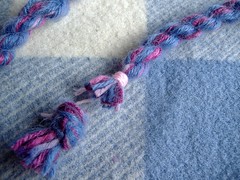
Repeat the process so you can remove the large knot at the end. It is too bulky for the inside of your bag.

Leave the folded end as is.
Position one handle.

Ensure it is centred properly. Then attach to the inside of your bag.
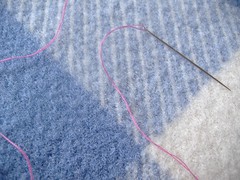
I prefer to use a needle and regular thread when attaching the handles. You can use wool if you like, but I find that the thread adds less bulk.
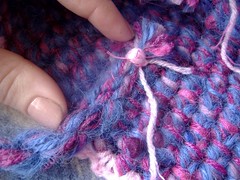
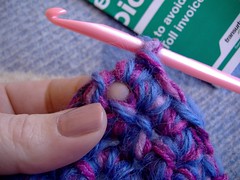
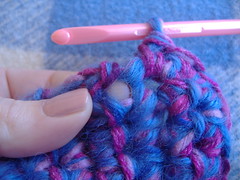
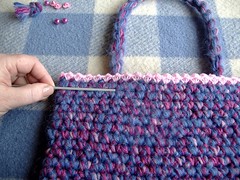
The best way of securing is to stitch up and down the handle (the section marked in the photo between my finger and thumb) Be sure and work right the way through the handle and the full thickness of the bag. Keep your stitches small on the outside of the bag, and they will disappear into your work.
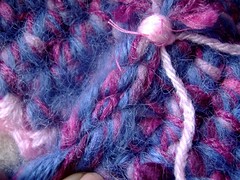
You might need to click on this photo and enlarge it to get a better view here. You should be able to see some of my stitches in the dark pink thread, attaching the handle to the bag. I have worked my way up and down that section 3 or 4 times... although most of the stitches are not visible.
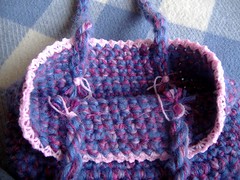
Repeat with the other handle. The inside doesn't need to look pretty, as the lining will hide a multitude of sins!
Add any embellishments you fancy. Then you are ready for the lining.
Click here to see my simple lining tutorial.
68 comments:
You are amazing, AMAZING !
I love how you start the bag with the base! Genius !
PS: Guess what . . . today I bought a SEWING MACHINE !! Yay !!
Now what to make . . . . . .
Thanks for an excellent post !
PS: you do GREAT tutes ! Love all the detailed pictures. Thanks heaps :-)
thanks soo much. What a great tutorial!!!!!!
Wonderful instructions, wonderful photos. A short bag with a wider base makes a delightful cat basket.
This is a fantastic tutorial. I even learned something new, who said you can't teach an old dog new tricks.
Cat.
thanks for the beautiful feedback everyone... I will be returning with more photos, and hopefully some lining instructions tomorrow or the next day
Thank-you for the detailed post I look forward to the rest. Very clear instructions. As Stramenda said, "You are amazing!"
*embarassed*
Exactly how did you attach the twisted handles to the bag?
Thank you so much! Now, I know what I'm making my girls for Christmas and for my niece for her birthday! Can't wait to see how you do the lining. :)
don't be embarrassed... you are probably just asking out loud the question that everyone else was thinking!
I have added a few more photos and steps to the tutorial, to explain the handle attachment. Hope that helps...
If not... let me know :)
Thanks for great tutorial!!!! Am starting my own right now. You have made me very brave lol.
you're welcome dawn... have fun with it... you know where I am if you need any help :)
Great tutorial! I'm going to try this bag out, including the lining.
Wow, this is great. I added a link on my purse blog (the entire sidebar is tutorials)
http://iwannanewbag.blogspot.com
thanks for linking to me woof nanny... took a quick peek at your blog, there's some fabulous ideas there... I'll have to head back when I have a little bit more time on my hands
I love this bag. Your site has brought me inspiration. Thank You
sherryknit - inspiration is such a wonderful thing... glad to have been part of yours :)
Beautiful! Love the colors you selected, and the inspiration to not be afraid to combine different types of yarns! Great site! So glad I found you today!
lisa - thanks for stopping by... be brave and experiment with those colours... you never know what you might discover
I love you! Haha, seriously~ I've been looking for the perfect crochet bag/tote pattern and this is absolutely IT. Thank you so much for posting this~ (^_^)
x
chell - you are so very welcome... it's a very simple formula, enjoy!
thank you so much for the tutorial...i am a newbie crocheter and have a question...*feel kinda dorky*...once the base is done, you do another sc in the same last stitch you did, go down the length of the rectangle, 2 sc in that 1st corner, do the width, 2 sc in the 2nd corner, go down the remaining length of the rectangle...and then do you do another 2 sc in that last corner? when i read the tute, i am only only grasping (3) places where you do 2 sc and not (4)...does this make sense? again, thank you...i can't believe how much i love crocheting and am so excited to try this...i already bought my yarn! =)
purple and paisley - don't worry about feeling dorky... I think it's wonderful you are trying something new... I'm excited for you!!!
YES... you are right... you should be working 2sc into each of the four corners of the bag...
have fun with the bag :)
happy crafting
thought you might like to see the bag i made using your tute (not quite done yet but soon)...and a much smaller version i came up with for a cell phone case...in my first post about the bag, i added a link to your site and gave you credit for the pattern...click here (and thank you again for the pattern):
http://purpleandpaisley.blogspot.com/2008/12/7-days-til-christmas.html
purple and paisley - you're welcome... I have been over and admired your work... and left a comment for you :)
Thanks so much for your easy to understand instructions! I just finished a small bag for my son's girlfriend. I loved making it! (well, except for the lining. Sewing is never fun for me) It is so cute, I hate to give it up! Thanks again!
Peggy
Awesome tutorial!
I'm just beginning to learn how to crochet and I came across this.
I had some yarn for 2 years (I hate the texture), but I wanted to use it in something that would make it practical (it turns out quite stiff when knitting). So, I looked for bags and voila! Here I am and have already begun.
Making this for my sister. Will probably crochet some red hearts and stitch them on once the bag is complete as well. :D
Thank you for this! So easy to follow.
How to ad strap to bag without sewing,just crochet?I am beaginer in crochet,cane You help?Thanks.
Adorable and so do-able. I'm making a mini-version of this for my daughter's 'American Girl' doll.
peggy - not wanting to part with it is a fabulous indication that you have made something super special... glad you enjoyed the tutorial
meiko - one of my goals in life is to find a use for the unloved yarns of this world... glad to help :)
princepita - you can just crochet the straps if you like, or make button hole style handles... anything you fancy!
nancy - sounds gorgeous :)
Do you know how I could add a pocket? I really love this bag, but I want to add a pocket. Your stuff is great, and I really like your blog. I actually was inspired to keep all of my yarn scraps by you so I can't wait to see what I can make from them!!
GREAT BAG! Nice and strong...just what I needed!!!! Thank you, thank you, thank you!!!
Your work is lovely! Great bag!
Cindy (Cshell)
A Knitter in Hull/Hulluva' Knitter, on ravelry.com
I just started making this but now that I have completed 2 rows around my rectangle-the base is curling up. Should I take off my 2 rows and start fresh with more sc around the base? Or should I keep going and the curling will fix itself? I'm new at this;)
gabby - an inside pocket or an outside one? either way, I would keep it easy and just make a patch pocket (a simple square or rectangle sewn on like a patch, but only stitched around three sides) if it's for the inside... just attach it to the lining BEFORE you sew the sides together... if it's on the outside, just crochet an extra rectangle and stitch it on wherever you fancy
cindy - you're very welcome
abby - try working a few more rounds and see how it goes... the base doesn't end up sitting completely flat, it kind of curve up to meet the sides... if it looks like a BAG, stick with it... if not, try again :) don't be too hard on yourself!
I finally made a bag using this tutorial and I love it! It was so easy to make and all of your pictures helped a lot. I added a lining (according to your bag lining tutorial) with a pocket and a zipper. I can't gush about this pattern/tutorial enough! Thank you so, so much for posting this!
Wow. I wish I had come across your site a LONG time ago. I made a bag today and lined it, all in a matter of about 5-6 hours. Your instructions for the lining were so incredibly easy to follow, even I got it, and that's saying something!! I've bookmarked your page(s) and will definitely be using them again! Thanks so much!1
Hi there I found your website last night and am very inspired. Did not sleep much as I kept coming up with lots of ideas. Today I have cut strips of old fabric and am having a go at making a rag bag using your easy peasy pattern. It seems to be working out great and it is so simple. I taught myself to crochet a few months ago and this is just great. Can I just ask what SC means. I have only heard od DC (double crochet and treble crochet so far. MAny thanks for such an inspiring site.
Cheers
Jennifer
Hi, I made myself an "easy peasy corchet BASKET" from this tutorial, the photos are in my blog
http://doraquevedo.blogspot.com/
There's a link to your tutorial in the word "aqui" (the post is in Portuguese).
Thanks for sharing, it's easy, practical and cute!
hello I loved the details and pictures i wanted to know can I use double crochet and alsoiam trying to make a tote in the same way will it come out okay
thanks
thanks for your pattern i was looking for an easy pattern to try out crocheting with PLARN (plastic yarn eg carrier bags) and its working great so far ive done the base i just working my way to the sides this pattern is fab thank you very much :)
Great tutorial.
I'm making this bag with plastic bags (recycling-recycling)
Thank you so much/
Brilliant! This was the first thing I've made from a pattern, and I'm so chuffed with how it's turned out that I'm giving it to my mum as a Christmas present. I made mine a bit bigger and narrowed it towards the top, but it looks excellent.
Thank you so much for such an easy peasy lemon squeezy design. Suddenly I feel like I am a crocheter, rather than someone who can only make scarves!
thanks for sharing the pattern. I made two for my little ones and they love them. You are right about the lining; it gives them such a nice look! Thanks again.
Crochet a beautiful and easy to love this pattern Thanks effort
Thnx for ur pattern, it was so easy. I finished mine yesterday n added the lining. My daughter is in love w her new bag. Thnx again, u made my day. Blessings to u n family
Hello, I have searched every where for a pretty bag pattern with no luck until I saw your bag. Love everything about it. Thank you so much.
Will this work with nylon?
Amanda... Yes it WILL work for nylon. I've used this pattern when working with t-shirt yarn, rags, and plastic strips... successful every time!
I was wondering instead of doing the step where you create the base by chaining like you did on the piece of paper, if we chained the base as long as we wanted it. Would that work too? And how many rows did you do before it started to shape up? :)
Yes. It would work just the same if you chained the length of the base instead. I guess it takes about three rounds before you see the sides of the bag really starting to rise and take shape... Hope that helps.
I AM SO SO SO SO SO SO SO SO SO CONFUSED!MY YARN WONT STAY TWISTED! I CANT MAKE THE BASE INTO A BAG! MY HOOKS ARE TOO SMALL! CAN I USE A SMALLER ONE OR MY FINGERS? CAN I USE 1 YARN? WHAT IS PLARN?IT ISNT AN EASY PEASY CROCHET BAG 4 ME!
PLZ ANSWER ASAP!
Hello.
Yes. You can make this bag with a smaller hook and a single strand of yarn. Just follow the same instructions. Plarn is Plastic Yarn made by cutting grocery bags into strips, which you then crochet with.
OK, I feel really dumb for asking this question. It isn't even a crochet question.How do I twist the yarn? I am using acrylic yarn (only 2).
Thank you,
Candy
Hey Candy... Which twisting are you talking about?
At the beginning, I just twist the yarns between my fingers to see how they will look together.
When actually working the bag, the yarns are not twisted - just held together.
And there is a link in the post above for the instructions for the twisted cord handles.
Hope that helps.
Sharon
Do you have to twist yarn together? Or can you just use one ball of yarn?
I used a few strands held together to make a really thick yarn. It also gave some interesting colour to the bag.
Yes. You can use a single strand of thick yarn if you prefer.
Loved it . But,I accidentally washed it and it became felty.
???
What happened?
This is an amazing tutorial!! I'm having a problem though... I have a fairly large base and as I'm doing the sides, only the last couple of rows curl up but the "older" side rows are just flattening out like the base. If I keep going will it fix itself, or will it continue to stay pretty flat? I'm thinking of maybe skipping some of the scs in the corners to "right" it, but I'm not sure how that would look.
Love the purse; And thank you for the tutorial on the corded handle. This is different & will try on my next purse. Also I like your technique for making the bottom to your own dimensions. You are fantastic. I have learned so much.
Wondefully explained tutorial. Love the black and grey bag that you had linked to this too.
Thank you so much for this wonderful pattern and tutorial. I've made 2 bags from this pattern.
The pictures were a huge help. :D This is the one I made for my Mom:
http://www.ravelry.com/projects/WinterRoseBlooms/easy-peasy-crochet-bag-2
y
I am truly loving this bag. Ian using two colors sky blue and black with silver flecks. I want to add handles but I am not sure if I should use something different from twisted yarn...any ideas? I love love your tutorial.. It is so very helpful..
I love this bag. I have spools of straw ribbon (more like plastic) and would like to use that to make the bag. I want the bag to be about 12" long by 3" deep. What size hook should I use and are there changes to the pattern? I believe you made a black one out of plastic bags. Thank you.
thanks soo much. What a great tutorial!!!!!!
rustic pillows and throws
toddler decorative pillows
geometric throw pillow
I didn't know that crochet could do everything, making gloves, hats, bows, hair clips, flowers, and even bags!! wow! that is amazing. This demonstration is pretty. That is my favorite color, I loved how you demonstrated it and how you make it, it is indeed pretty. Thank you for the tutorial.Local Citations
so adorable digitizing embroidery service work
When it comes to reliable packaging, partnering with trusted pp carry bags manufacturers ensures consistent quality and performance. These manufacturers use advanced weaving technology to produce durable, eco-friendly carry bags perfect for retail and industrial uses. Their PP carry bags are lightweight, moisture-resistant, and fully customizable, helping businesses promote their brand while ensuring product protection and sustainability.
This is a great beginner friendly tutorial. Crochet bags are a perfect project for learning the basics because you repeat the same stitches while still ending up with something practical you can use every day. The step by step photos are really helpful too, especially for people who are just learning how to recognize stitches and follow rows.
I also like the approach of mixing yarn types and strands together. That’s a fun way to experiment with texture and color, and using a slightly smaller hook to create a firmer fabric is a really good tip for making sure the bag ends up sturdy enough to hold things.
Projects like this are a great example of how simple pouch or bag structures can be adapted in lots of creative ways. From crochet bags and fabric pouches to other styles designed for different uses, the basic idea of a structured container stays surprisingly similar. If anyone is curious about other pouch styles and structures, you can see some examples here: mylar bags custom printed.
Thanks for putting together such a clear and beginner friendly tutorial!
Post a Comment