Do you question everything and everyone?
Are you always wondering about what goes on behind the scenes?
What motivates people to behave the way they do?
And why can't things be done differently?
Is your Inner Preschooler always demanding to know WHY - WHY - WHY - WHY - WHY?

As a Designer, I'm often asked WHY?
Why did I start the body at the bottom instead of the top? Why did I place the seam to the left instead of the right? Why did I work a project flat instead of in the round? Why did I work separate pieces instead of as a whole? Why choose the acrylic instead of wool or cotton? Why use three strands at once instead of a bulky? Why, why, why, why, why?
Please don't think that I'm complaining. I'm not.
I actually find it fascinating, because so many of these decisions are automatic to me. In fact, I almost don't even realise that I've made a decision. I've just done what I needed to do, for the effect that I wanted.
So it's intriguing to think about WHY I made those choices. To really think about what the alternatives were... why I didn't choose them... and how different the overall effect would have been if I did make another choice.
The reason this is playing on my mind right now, is because my Onarum Shawl pattern has been released for testing - and it has triggered a couple of questions. All pattern releases prompt questions about yarn choices and sizing, but these questions were specific to the design itself.
The first one related to the fact that the wrap is made from two pieces, which are seamed at the centre back. People want to know why the shawl wasn't made all in the one piece. After all - if it was in one piece then it wouldn't need to be seamed. And most people hate to seam, so surely it would be better as a one-piece? I get it. Not everyone is talented at seaming, and even those who are - do not want to waste time on it, if there are alternatives.
Well. I seamed the back because I wanted the crochet pieces at the front to be identical. Because the front tapers, if you wanted to work it as a whole, you would need to increase at one end of the wrap and decrease at the other. That's not difficult to do, but they will not look identical. My original plan was for the wrap to sit snugly across the bust and fasten flat at the front (rather than with a knot and tassels) so I really wanted each side to look perfect.
Could you work it as a whole? Of course you could... but I chose not to!
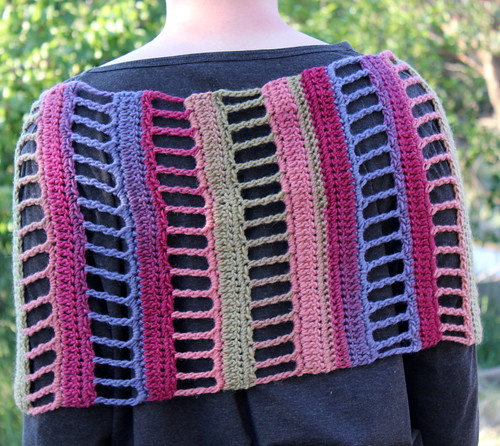
The other question relates to the back of the wrap. See the way there is a wide band? It's sitting slightly to the right in this photo.
Well that band is MESSING with people's heads!!!
It's funny, you know - I barely notice it... yet other people are beside themselves about it not looking right! Such a little thing, really. But it's actually making people BONKERS.
Totally not criticising here. I think you should know that. I'm just intrigued, that a detail which I barely notice - will drive someone else nuts. It actually makes you wonder how any of us manage to get along in this world, since there's much bigger issues out there to disagree on!
So. WHY did I do it?
Well, I was planning to add some embellishment to the back of the wrap. I'd been thinking along the lines of a row of buttons along the seam. Or maybe a decorative cross stitch seam. Possibly even some surface crochet swirls. The wider band allowed me to play around with embellishing, without interfering with the stitch pattern.
As it turned out, working with such a colourful yarn - I didn't really need details like that in the back. I know because I tried. It was definitely overkill. So I added tassels on the front instead... Yep. Couldn't help myself. It HAD to have something!
And now for the big question. Can the wrap be made without that band?
Of course it can.
Have a play around with the pattern.
You could work side one with just one row of sc after the tall dtr row. Then fasten off. On side two, work the tall dtr row, followed by one row of sc and one row of dc. Then fasten off. It might not make sense to you now - but when you reach that part of the pattern it will.
Or someone suggested that you could work a zig-zag join between the two pieces, which would mimic the "dtr, ch 2" row... Now that's damn clever, and I think I'll have to test it out and maybe alter the pattern. Very clever indeed!
See. Questions are not a bad thing. In fact, sometimes they lead to a better end result.
And that is brilliant...
Now. Any more questions?
1 comment:
I love seeing the process behind design ... from inspiration to the development of an idea through to the construction process. I find it fascinating. Thanks for sharing :)
Post a Comment